News:

Please read the Forum Code of Conduct   >>Click Here <<

Main Menu
Menu

Show posts

This section allows you to view all posts made by this member. Note that you can only see posts made in areas you currently have access to.

Show posts Menu

Messages - StanAmes

#91
Quote from: Schweinebacke on May 09, 2016, 01:09:44 PM
Kevin, Looks like you wantend to add. more in your reply ?
F0 = all function light light, flicker etc. on
F1 - F8:  sound activities
Details are documented under soundtraxx
Sincerely
Juergen

Juergen

Please try the suggestion I provided above.  You should be able to control the smoke via F0.

Once confirmed that it works that way you can go to the CVs and remap which function does what.

But first you need to confirm it works.

Thanks

Stan
#92
It has been a very long time since I played with the CVs on the Climax so I am going from memory.

At the time the Climax was developed I beliieve it was the desire that all functions could be controlled by the EZ Command which means that all functions had to fit into F0-F8. 

All the locomotive functions were therefore put into F0 and the sound in the other functions.

The decoder actually supports many more functions both sound and lighting.

If you look at the detail Soundtraxx manual you can use the higher end functions and reassign the functions to whatever function Key is desired.

The decoder also supports 4 physical punctions (Lighting and smoke) but I believe these are all assigned at the factory to be F0.

Looking at the manual the physical switch behind the smokebox controls the smoke

Always on (on)
Always off (off)
Controlled by the device in the socket (DCC)

First turn the smole to on to be sure that the smoke unit is actually working.

Then turn it to DCC.  I bet it will turn on and off using F0.

I so suspect that you can reassign the physical functions so that the smoke and lightng are seperate.  However the firebox lighting and the smoke may be on the same physical output in the decoder even though they are on two seperate pins on the socket.

Hope that helps

Stan


#93
Large / Re: Won't link to run
April 17, 2016, 07:47:02 AM
Try the following

1) put the locomotive on rollers and make sure the connections between the tender and locomotive are tight.

2) make sure the battery is connected to the 18 volt battery input and not the 6 volt input

3) Switch the battery switch to track

4) Put the DC dummy board in the socket

5) Switch the battery switch to battery, the locomotive should take off at full speed.

If the locomotive runs in this mode and not when the revolution is plugged in then it is a problem with the revolution.  If it does not run in this mode it is a problem with the locomotive

Hope that helps

Stan
#94
Large / Re: Plug'n'play battery hookup
January 31, 2016, 06:54:42 AM
Quote from: Howard240 on January 26, 2016, 08:42:02 PM
I'm using a 11.1 v battery in my Climax with Plug'n'play board and Crest receiver.  I assume the battery hooks into Batt ! connector. Is this correct?

Batt 1 says 18v and Batt 2 says 6v.  I'm finding two battery inputs a bit confusing.
Thanks for any help.

The 18 volt input is for your batery input.  The 6 volt input is for sound cards in DC operation to provide voltage to the cuff circirts when the track voltage is low.

Using 11.1 Volts is fine.  The locomotive will just have a top speed less then a 14.4 volt pack.

Hope that helps

Stan
#95
Large / Re: Consolidation 2-8-0 engine
January 02, 2016, 08:47:00 PM
Quote from: Loco Bill Canelos on January 02, 2016, 06:20:11 PM
Good point Stan,

I have both the original Connie 2-8-0 and the newer C-19 2-8-0.   in my above reply I was referring to the original 2-8-0 rather than the C-19 2-8-0.   In the Catalog it says the C-19 performs best on 8 foot diameter curves or better, and in the online catalog it also says 8foot diameter as well.  Neither mentions a minimum diameter.

http://shop.bachmanntrains.com/index.php?main_page=product_info&cPath=255_433_702&products_id=5288

Stan I was wondering where you find the R@ or 5 foot minimum diameter info???

Bill

Bill

By testing. 

The C-19 has two blind drivers and lifters (which can be removed) on the blind drivers which keep then from dropping beneath the rail height. 

When going around the 5 ft diameter track the 2 blind drivers are actually off the rail.


The 1:20 cars on the other hand do require 8' diameter track.

Stan
#96
Large / Re: Consolidation 2-8-0 engine
January 02, 2016, 04:47:26 PM
Quote from: B C Carr on January 02, 2016, 02:52:22 PM
I am a new (and old age) train owner. Have not yet set up layout. Question: Can the above engine 2-8-0 run on the tightest curve track? Someone told me it could run only on a curve track which makes a 9 foot diameter circle. Because of space limits I would like to run on a tighter curve in places. Please send email (carrbc@aol.com) if you can.

Thank you so very much!

Bachmann has built two 2-8-0 locomotives.  The C-19 2-8-0 that is currently in their web store was designed to operate on R2 or 5 ft diameter track.  Naturally it looks a lot better on 8 ft or larger diameter track.

Stan
#97
While all code 332 track is interchangeable, the quality of the brass uses by the different manufacturers differs.  Also different is how the track is designed and how closely it follows the standards.

Piko and Bachmann brass track are two of the best designed track systems out there in my opinion.

Stan
#98
Large / Re: Couplers
August 06, 2015, 08:00:58 AM
Both the C-19 and the new Climax come with high couplers but have offset couplers in the box to all coupling with the Big Hauler truck mounted couplers.  The change out the couplers only involves a few screws.

Hope that helps

Stan
#99
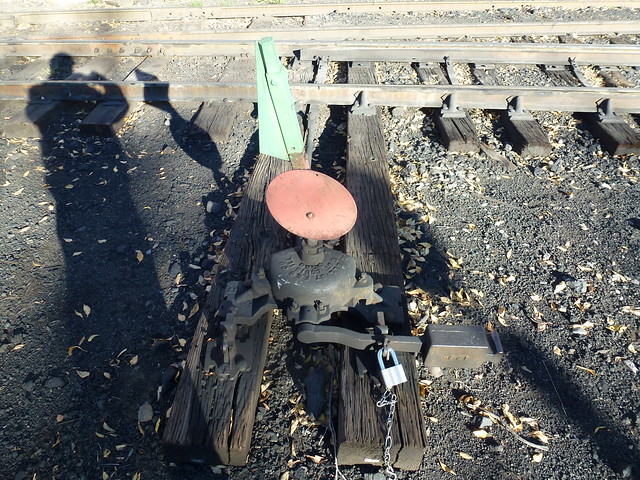
Large / Re: New Bachmann 94648 switch stand review
June 29, 2015, 06:21:24 PM
Quote from: CCSG on June 29, 2015, 01:18:33 PM
I just looked at the switch stand on the Bachmann Store and would reverse what I said in my last post due to the color of the targets. I think red should indicate a divergent route and reduced speed while the green target would indicate high ball. Of course you could repaint the targets the correct colors.


The Bachmann switch stand target colors are correct as produced and follow common prototype use such as the D&RGW.

Stan

#100
Large / Re: 1:20.3 Spectrum Forney electeonics
June 03, 2015, 04:02:17 PM
Tom

Glad it worked

For future reference.  If you use the board with all the wires then you need to connect the + and - wires on that board to DC power.  If these wires are not connected to DC power (such as the Battery) then the internal locomotive electronics are not powered.

The Dummy PC board has a built in rectifier and makes the connection for you.

Stan
#101
Large / Re: 1:20.3 Spectrum Forney electeonics
June 02, 2015, 10:51:31 PM
Tom

Please reread my message above

If you want to PM me we can talk on the phone.

If you do not have DC voltage at the +and - terminals on the Bachmann board you will not get the features you desire.  If there is nothing in the socket and you have not hooked up the + and - connection you will not have DC voltage to the locomotive which is needed to get these functions working,

If the fan is not running you do not have DC voltage on the board.

To solve your problem we need to know what is in the socket and what connections you have made from the Airwire board and the batteries to the Bachmann board

Stan
#102
Large / Re: 1:20.3 Spectrum Forney electeonics
May 31, 2015, 01:05:20 PM
Tom

Airwire now has a plug in board for future installs.

The key to making the chuff work is ensuring that the +- on the Bachmann board is powered.  Easily checked with a volt meter.

If not powered the fans, the chuff and most of the lights will not work.  If the fan is working you have power.  No fan = no power

Normally when you place something in the socket, that devices powers the + and -  If nothing is in the socket and you are using batteries, simply connect the batteries to the + and - connections on the Bachmann board.

You may also have to connect the phoenix ground to the - connection.  Most times this is not necessary.

Hope that helps

Stan
#103
I believe the clip is to prevent damage in shipping.  It should be removed from all of the cars as its purpose of to prevent movement of the coupler.

The small parts bag in the cars I have are spare parts which I use if I loose or damage one of these parts.

The tanks also have what looks like a hazardous label placard which I have never used.

Hope that helps

Stan
#104
Quote from: jviss on May 03, 2015, 01:39:44 PM
I have another question: what prototype era and type do these switch stands model?  I mean, what decade or decades, and standard or narrow gauge or both?

Thanks,

jv


The prototypes for this are common on both narrow gauge and standard gauge railroads and are still being manufactured and put in use today although most today have a different arm to make throwing a turnout easier an the back. (a Google search will pull up several current manufacturers)

I am not sure when they were first produced but suspect that they date from the 20s or 30s.

Stan
#105
Quote from: jviss on April 23, 2015, 11:31:10 AM
They will work with Bachmann steel switches?

Yes they will work but you have to do a few extra steps.

1) The Bachmann "steel" turnouts only have one tie with a hole in it.  The manual ground throw needs to attach to two ties so you will need to drill a hole in the second tie for the attachment screw to go through

2) The throwbar for the "steel" turnouts was designed for manual movement.  You would need to cut the end of the throwbar off  so it is flat and then drill a small hole for the lever on the new manual throw to fit in.

I have tested these new ground throws on a variety of commercial and hand made turnouts and they work very well.  I plan to use them on most of our turnouts on our layout.

Stan