News:

Please read the Forum Code of Conduct   >>Click Here <<

Main Menu
Menu

Show posts

This section allows you to view all posts made by this member. Note that you can only see posts made in areas you currently have access to.

Show posts Menu

Messages - jonathan

#61
HO / Re: Jonathan's Layout #3
February 20, 2021, 05:04:44 PM
Thanks, Ken.

A long time ago,  I ordered A LOT of LEDs and resistors from China--dirt cheap.  Two layouts later, and I still have some.  There's 27 resistors left, perhaps a dozen warm/white LEDs and a bunch of blue/white.  Used up all the SMDs.  Was the most economical way to do lights... albeit a bit labor intensive.

Regards,

Jonathan
#62
HO / Re: Ken's Railroad
February 20, 2021, 04:58:51 PM
I get a little more impressed every time you update the layout.  You seem to take cardboard, plaster, and matchsticks (over simplification) and turn it into some very realistic looking scenes.  There's a real art to it.  Thanks for sharing your progress! 

Looking forward to more.

Regards,

Jonathan
#63
HO / Re: Jonathan's Layout #3
February 20, 2021, 03:01:50 PM
Thanks, Terry.

Started crawling under the layout.  Procrastinating on the stall tracks, but I did play with some lighting, just to get started.

Almost out of warm/white LEDs. Still have a gross of blue/white. Decided to use some blue/whites in the roundhouse:

DSC_0540_01 by Jon Vogel, on Flickr

I wired these in parallel. It's more work, but I think it will be easier to correct a problem in the long run:

DSC_0541 by Jon Vogel, on Flickr

A few structures got wired up, too:

DSC_0544 by Jon Vogel, on Flickr

OK. Gotta Psych myself up to start wiring stall tracks.  There are 12 of 'em and each one has an on/off switch.  Lots of wires to string back an forth.  No fun holding a soldering iron over your head and keeping it steady.  Alright, positive thoughts...

Regards,

Jonathan
#64
HO / Re: Jonathan's Layout #3
February 19, 2021, 02:14:35 PM
Update:

I'm about to spend a very long time under the layout, wiring stall tracks and lighting (fun).  There won't be much to show for a while.  However: here's a couple of shots up top.

The roundhouse is getting close to completion. Gotta add the window glazing and put up some lights:

DSC_0535_02 by Jon Vogel, on Flickr

I built this on a very flat surface.  The benchwork is not as flat. So, I had to compensate. Oh well. That's what scenery is for:

DSC_0536 by Jon Vogel, on Flickr

There are other little structures going up around the roundhouse:

DSC_0537_01 by Jon Vogel, on Flickr

Innards a bit more visible here:

DSC_0538 by Jon Vogel, on Flickr

I know my background hills aren't supposed to be cobalt blue.  :)  
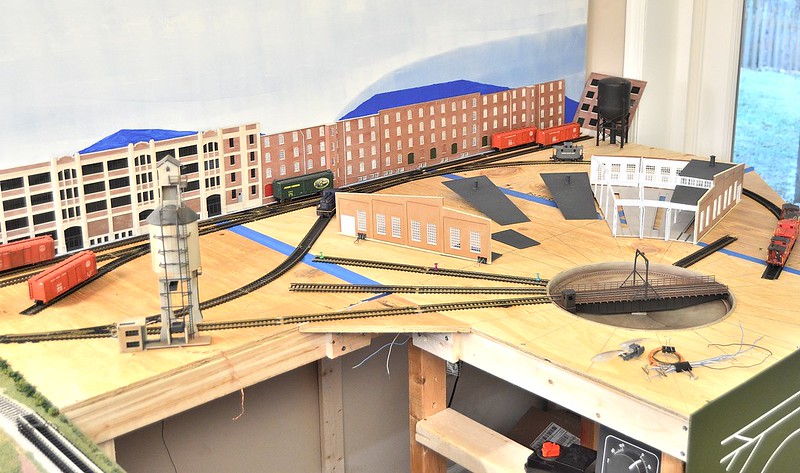
I'm playing with colors right now, to see what works.  Tough job for a color blind guy:

DSC_0539_01 by Jon Vogel, on Flickr

Once everything is wired up, and I can move locos in the roundhouse, I'll post some photos.  Could be a while...

Regards,

Jonathan
#65
HO / Re: Sheldon's Layout
February 15, 2021, 12:36:45 PM
Your gravel roads look better than anything I've attempted. Gravel roads are surprisingly hard to model.

Regards,

Jonathan
#66
HO / Re: Heavy Mountain Pilot trauck derails alot
February 14, 2021, 03:41:30 PM
Pilot truck wheels are relatively easy to adjust.

You need a wheel/track gage to check the gap in the wheels.

There is a tight plastic liner in one side of the wheels.  This makes it possible to TWIST the wheels by hand.  Work slowly and gently.  You should be able to gently pull/push the wheels in/out as needed... while you are twisting.

A slight change--like 1/64th" can make all the difference.

As an aside, almost every steamer I've ever owned needed a slight adjustment to the pilot truck.  just sayin'

Regards,

Jonathan
#67
HO / Re: Heavy Mountain Pilot trauck derails alot
February 13, 2021, 02:59:34 PM
The Heavy Mountain is one of my personal favorite locos.  I have two.

There are some things you can do to help this loco.

If you have an HO track/wheel gage (must have for modellers), remove the front truck and check the wheel gages.  It is typical for Bachmann steamers that the pilot truck wheels are a bit out of gage--usually a bit too narrow.  After that, make sure the wheels can turn fairly freely.

I added just a touch of weight to my pilot trucks: a penny, a small, flattened piece of lead... whatever you can make fit.

These locos are heavy, but can be helped by adding a little weight in the smokebox area.  Helps balance the weight closer to the middle of the drivers.  This will help prevent the front drivers from climbing over the rails on a curve.  On that subject...

These locos will manage 22" radius curves, but handle 24" radius curves much better.

Regards,

Jonathan
#68
HO / Re: Jonathan's Layout #3
February 13, 2021, 02:00:05 PM
I'm at a stopping point.  Next step is to get under the layout for a while.  So... time to take a break, and snap a few photos to share.

Here are a few overview pics to show the final track plan.  I particularly like the giant question mark that leads to the caboose track:

DSC_0525_01 by Jon Vogel, on Flickr

DSC_0526_01 by Jon Vogel, on Flickr

Looks like there will be room for a 9-stall roundhouse:

DSC_0527 by Jon Vogel, on Flickr

The yard tracks are some really, REALLY old brass track I had stuffed away in a box.  I cleaned it up as much as possible, and made a lot of track feeders.  The rail-joint feeders are installed on nearly every joint.  Hopefully, I'll be able to maintain some kind of continuity:

DSC_0528 by Jon Vogel, on Flickr

Most of the partially-constructed roundhouse is painted white:

DSC_0531_01 by Jon Vogel, on Flickr

I intend to weather the exterior heavily.  Thought the white might look nice when it's really dirty.  Plus,  whatever interior lighting I make will be helped by the reflective interior.

Fun shot:

DSC_0532_01 by Jon Vogel, on Flickr

Finally, this is a small control panel I incorporated into my fascia:

DSC_0534_01 by Jon Vogel, on Flickr

I intend to have the turntable switch and stall track switches mounted in that area.

Regards,

Jonathan

Addendum:  I WILL be using good quality track for the roundhouse.  'nuff said.
#69
HO / Re: Sheldon's Layout
February 12, 2021, 09:55:08 PM
Noice!

Regards,

Jonathan
#70
HO / SW-7 Mods
February 12, 2021, 07:46:53 AM
Folks, I'm helping out graywolf with an article he wanted to share. Hope this works:

Here are 2 photos of my SW7 switcher which has been causing me trouble because it is so light. Most of the time, it had difficulty going over switches that didn't have power to the frog or some areas of track that were not perfectly spotless. The situation was the fact that it weighed only 9 ounces. I could help it along by placing my finger on top to give it better contact. I tried many things such as cleaning the wheels and even cleaning the track in front of it as it ran along. I powered all the frogs that seemed to be causing the problem. Finally, I decided to remove the shell to see if I could add weight inside. That was hopeless because it was so stuffed with gear and electronics. The engine is only 6 inches long.

The next step was to see if I could add weight externally and also justify the act of doing so and still have realism. I found some new brass toilet bolts in my junk box that weighed in at almost 3 ounces. As you can see, those are now sitting on top of the engine. I cut the heads off the bolts,but didn't want to lose the weight. So I decided to use the heads to bind the threaded parts of the bolts around the exhaust stacks. I glued the heads to the bolts from below using hot glue. I painted them black to blend in and sat them on top. They added 2.85 ounces to the engine and made a big difference in operation.

Now I had to justify what I did to the model train world. In keeping with the current state of the world regarding Covid-19, I rationalized that the engine was assigned the task of moving refrigerated cars which carried the vaccine from place to place. So therefore what you see on top of the engine are the cooling coils for the refrigeration system that was retrofitted to the engine to make things happen. Case closed.   Paul Case   

01A by Jon Vogel, on Flickr

01B by Jon Vogel, on Flickr

#71
HO / Re: Jonathan's Layout #3
February 09, 2021, 03:24:54 PM
Thanks, Paul!

I get a jolt whenever I see your name.  My brother is "Paul G"(MI).

Regards,

Jonathan
#72
Bill,

Serious as I can be...

It will be FAR more economical to search eBay for a used 0-6-0 that runs well.  They can be had in a range between 10 and 40 dollars.

It's a tad bit challenging, but you can swap out the locomotive shells, if you have your heart set on the Christmas paint scheme.

There are no replacement parts for the older locomotives because the design keeps improving over the years... Like getting rid of plastic axles.

I believe you will be far happier, rather than trying to fix something without the parts you need.  Just sayin'

Regards,

Jonathan
#73
HO / Re: Jonathan's Layout #3
February 08, 2021, 06:25:28 AM
jward,

It pays to take pictures.  I see what you're talking about.  Thanks for showing me. Up close, in person, it looks more like a hump on the outside rail.  I'll have to deal with that while I'm wiring up the turnout.  Again, many thanks.

ebt,

Thanks.  Trains appearing out of the trees, or from behind a hill, or industry.... that was a memory of mine. 

I also remember out west, one could match speed with a train and keep it in sight for along time.

Regards,

Jonathan
#74
HO / Re: Headlight on 2-8-0
February 08, 2021, 06:16:40 AM
https://www.bachmanntrains.com/home-usa/board/index.php/topic,22055.0.html

Bill,

The link above will take you to one of my threads about dealing with the 2-8-0 headlight.

I'm afraid the only way around the dim light is to remove the LED from the frame and put an LED inside the headlamp can.

It's not too terribly difficult.

The dim headlight is a well-known issue.  Just the way it was designed.

I must have a dozen posts about tinkering with the 2-8-0.  No one else has ever suggested, or at least posted about, another way to make the headlight brighter. (caveat...--that I can remember)

Regards,

Jonathan
#75
HO / Re: Jonathan's Layout #3
February 07, 2021, 09:43:41 AM
Thanks Ken.

I do have to be mindful of the photos.  Only have room for 400 more pics, before flickr starts to charge me.  ;D

Regards,

Jonathan