News:

Please read the Forum Code of Conduct   >>Click Here <<

Main Menu
Menu

Show posts

This section allows you to view all posts made by this member. Note that you can only see posts made in areas you currently have access to.

Show posts Menu

Messages - MrMoose

#46
HO / Re: New Ho train Kit
February 01, 2015, 09:51:33 AM
Quote from: DougInCal on February 01, 2015, 12:50:25 AM
Very interesting and informative thread.  MrMoose, I am very new and beginning to RR modeling.  Would explain what this "foam" is and where you found it.

It is what Guslcp said, insulating board the thickness you use is your choice most use either 1" or 2" depending on how deep you would want to cut sub terrain into it. Like streams, gullies, lakes, rivers, culverts, etc,etc. and pink is the most preferred insulation board to use.
#47
HO / Re: New Ho train Kit
January 31, 2015, 11:12:27 AM
I did not glue the track to the foam board..the only place I glue the track to was on the incline and decline foam risers.
And to answer the other questions I did countersink the screws so they fit flush with the ties. And I did test the track after I screwed it all down and everything works fine. Ballasting the track will hide the screws.
Cheers
#48
HO / Re: New Ho train Kit
January 31, 2015, 07:10:27 AM
Quote from: jbrock27 on January 30, 2015, 10:13:00 PM
Where did you find these screws?  And what size (not length) are they Moosey?

They are #8 drywall screws. I would of liked to use #6 but they don't make them 3" long just 2-1/2".
If I would of went with just 1" foam then I would of had no issues with length.
#49
HO / Re: New Ho train Kit
January 30, 2015, 04:14:30 PM
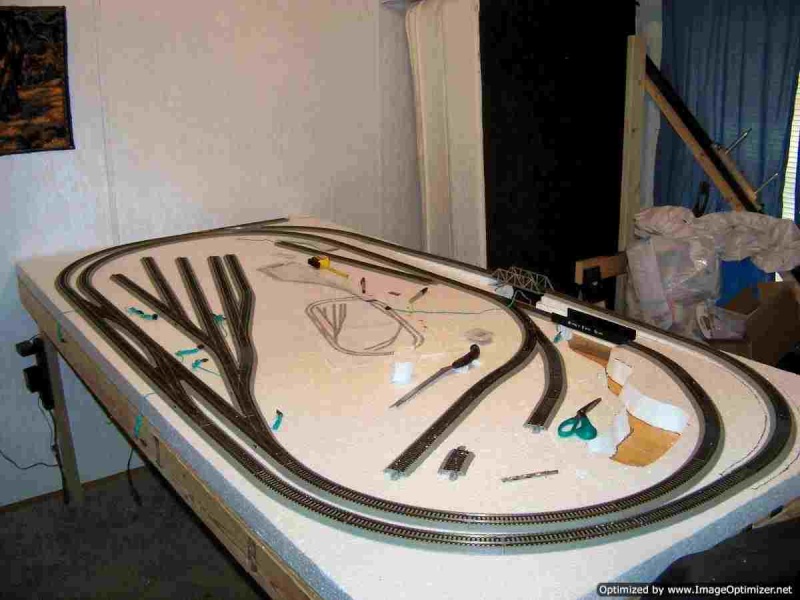
Well I got a little more work done on my layout. I drilled the holes for all the turnout wiring to go thru the plywood.
I glued the incline and decline down to the foam board and I glued the track down to the incline and decline foam.
Installed all the magnets to my spurs. Now I can start fastening the track to the foam.... In order for the screws to hold I have to go thru 2" of foam and into the plywood. The screws have to be 3" long for that to work. I'm going to drill a small hole thru the ez track between to ties and then countersink the hole so the screw head will be flush with the top of the ties. This way if I want or need to remove track i can do it with out messing with dry glue. Got my track all screwed down. Now I can start on all the wiring.

TooT, TooT...Keep on railroading!!!
#50
HO / Re: New Ho train Kit
January 27, 2015, 10:40:30 AM
3%, 3%,3%,3% hope you got that...lol
#51
HO / Re: New Ho train Kit
January 26, 2015, 09:39:54 PM
3 degrees
#52
HO / Re: New Ho train Kit
January 26, 2015, 06:28:50 PM
Here is a pic of my progress with my layout.


#53
I'm trying to upload a picture but I'm getting a upload folder is full. How do I reset it or empty the folder.
#54
HO / Re: New Ho train Kit
January 25, 2015, 01:46:34 PM
A little update:

I have the foam board laid down, and I have all my track except for one turn out which should be here soon.
I will post pictures soon. Thats it for now.
#55
General Discussion / Re: TRANSFORMER CONNECTION
January 22, 2015, 11:55:05 AM
You can buy extra wire with the plug on the end for plugging it into the rerailer.
#56
Quote from: gdrucker1 on January 11, 2015, 02:09:17 PM
Hello folks -
            My son got the Bachmann Easy DCC Command starter kit for christmas. When we plug the command center controller into the track - the number 1 button and the stop button flash rapidly. There is not any power to the train. Any ideas of where I can start to look for a solution? Thank you.
Try unplugging the wire that comes from the power suppy from the back of the command center, wait for 2 min and then plug it back in. See if that helps.
#57
HO / FYI E-Z Track
January 10, 2015, 01:37:38 PM
I have noticed a lot of lip burrs on the ends of the rails on each track section. You can feel and hear that lip well when your train runs over them. I took each track and de-burred the ends using a metal fingernail file. Train runs alot smoother now over the connections.
#58
HO / Re: Bachmann gp40 won't run
January 09, 2015, 01:03:25 AM
Yes I did finally figured that out. I hookup my E-Z command controller and button 10 is for analog and the Locomotive ran just fine. So I'll Have to get a decoder to run it with my NCE system. That I didn't know....Live and Learn.
#59
HO / Re: Bachmann gp40 won't run
January 08, 2015, 10:38:18 PM
Quote from: jbrock27 on January 08, 2015, 09:46:00 PM
The motor is still a DC motor and it should run from a DC power source like a power pack.  Is it possible you don't have the track properly wired up?  Do you have the ability to connect the motor leads to the terminals of a DC power pack and test it with power from the pack instead of the rails?

*And was this loco brand new or second hand?

I unplugged the power pack from the pcp panel and ran a couple of leads from it to the motor leads and it spun like crazy.
So would I have a bad board on the locomotive not letting voltage thru? The Nce power cab is ok it runs my other loco just fine.
#60
HO / Re: Bachmann gp40 won't run
January 08, 2015, 09:06:29 PM
While I had the motor out I tried to just touch the motor leads to the track rails and it wouldn't spin is that normal?