News:

Please read the Forum Code of Conduct   >>Click Here <<

Main Menu
Menu

Show posts

This section allows you to view all posts made by this member. Note that you can only see posts made in areas you currently have access to.

Show posts Menu

Topics - jonathan

#61
HO / Inexpensive Lighting for a Layout
October 26, 2012, 08:16:45 AM
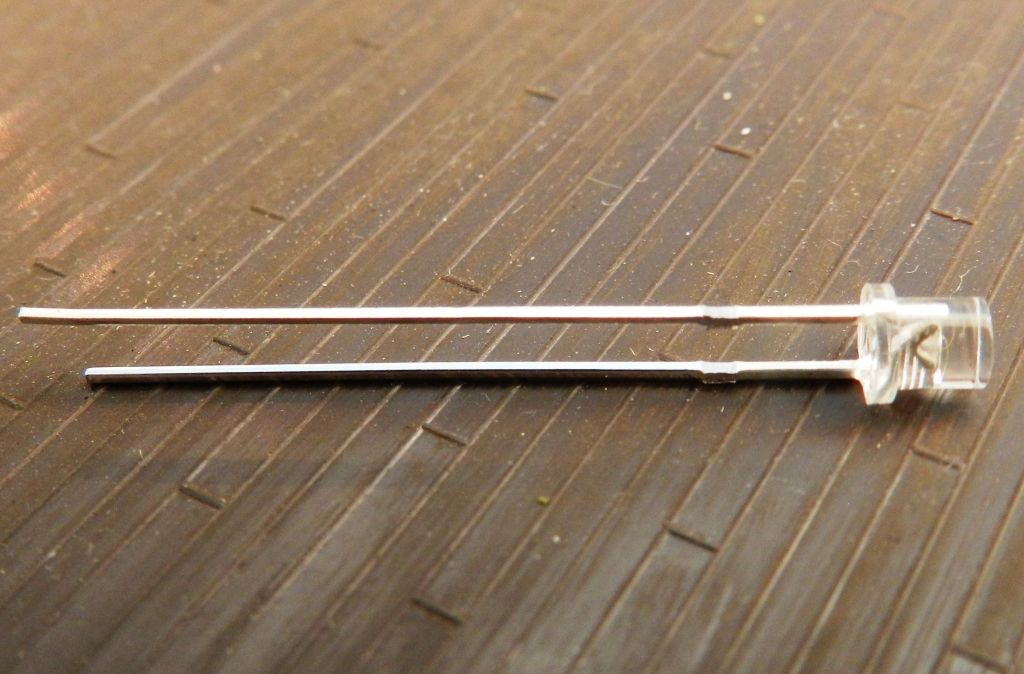
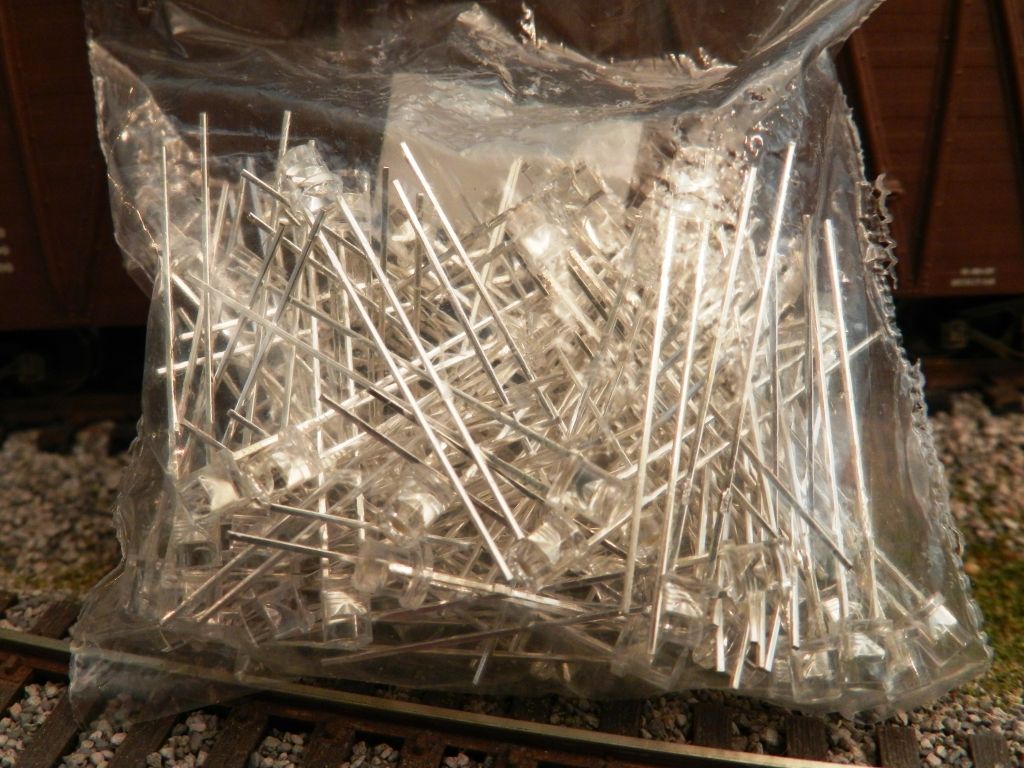
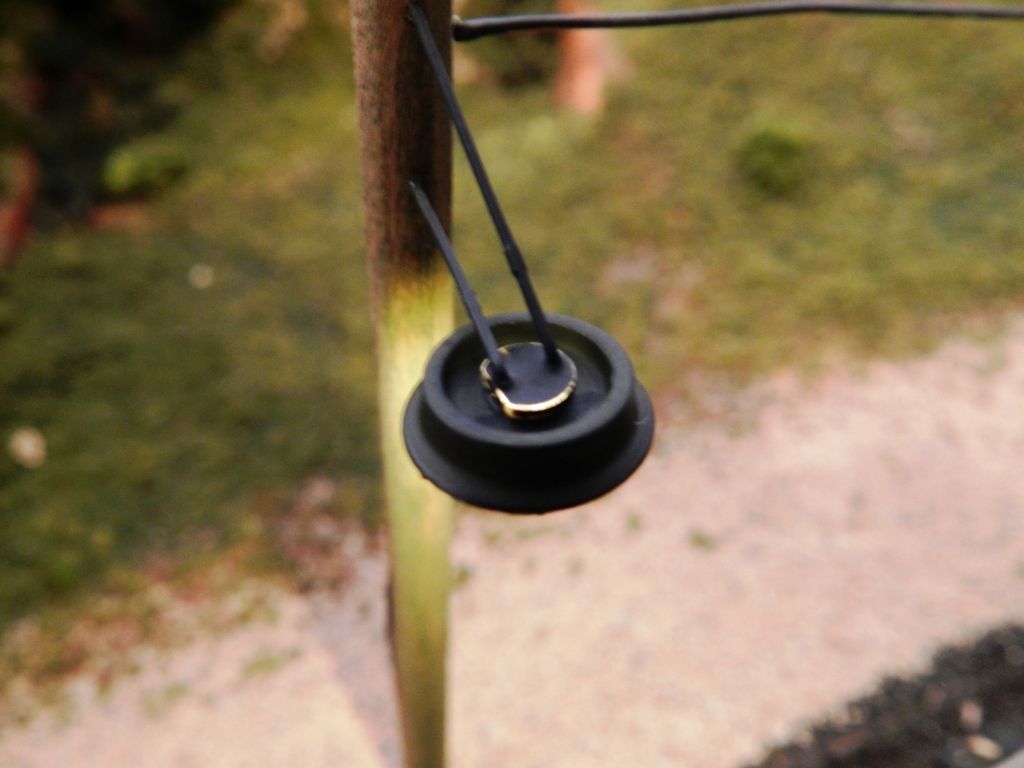
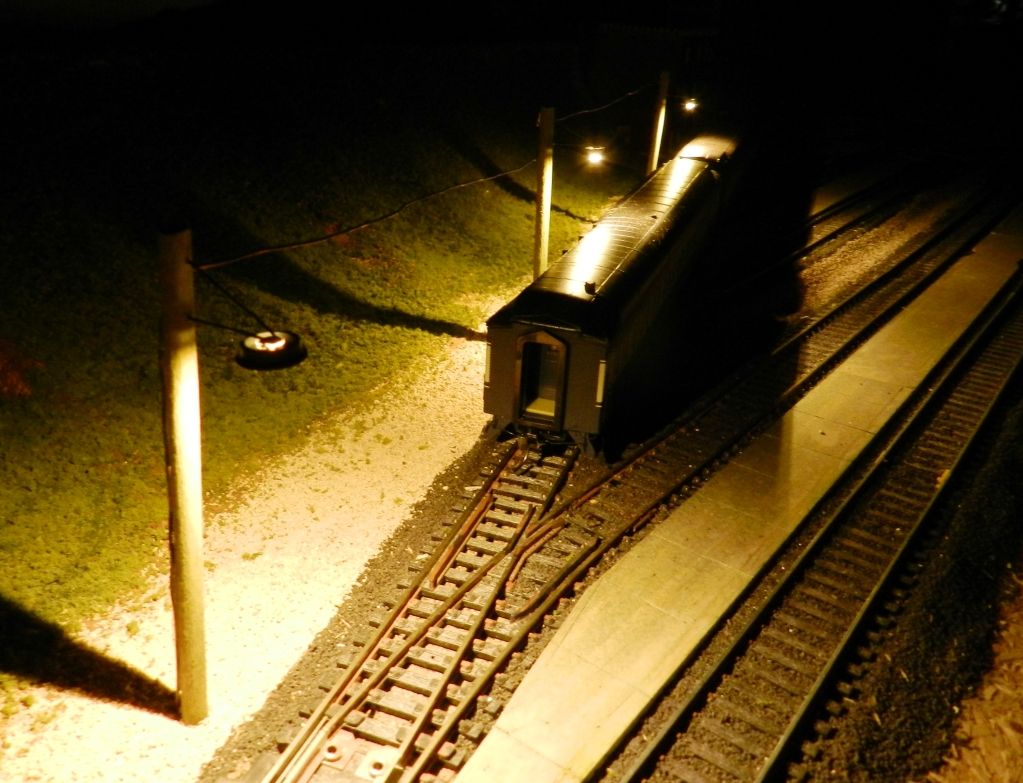
The projects keep on coming.  This time is a little lighting project that I wanted to accomplish as cheaply as possible.  Searching the internet I found I could order LEDs direct from China for 3.75 USD per 100.  That's less than 4 cents per LED!  These are warm white LEDs.


For 29 cents per 3' piece, I got 3/16" dowels.  560 ohm resistors were 25 cents a piece, and lamp shades were 43 cents a piece.  The scrap wire is free.  That works out to about 60 cents per working lamp post.


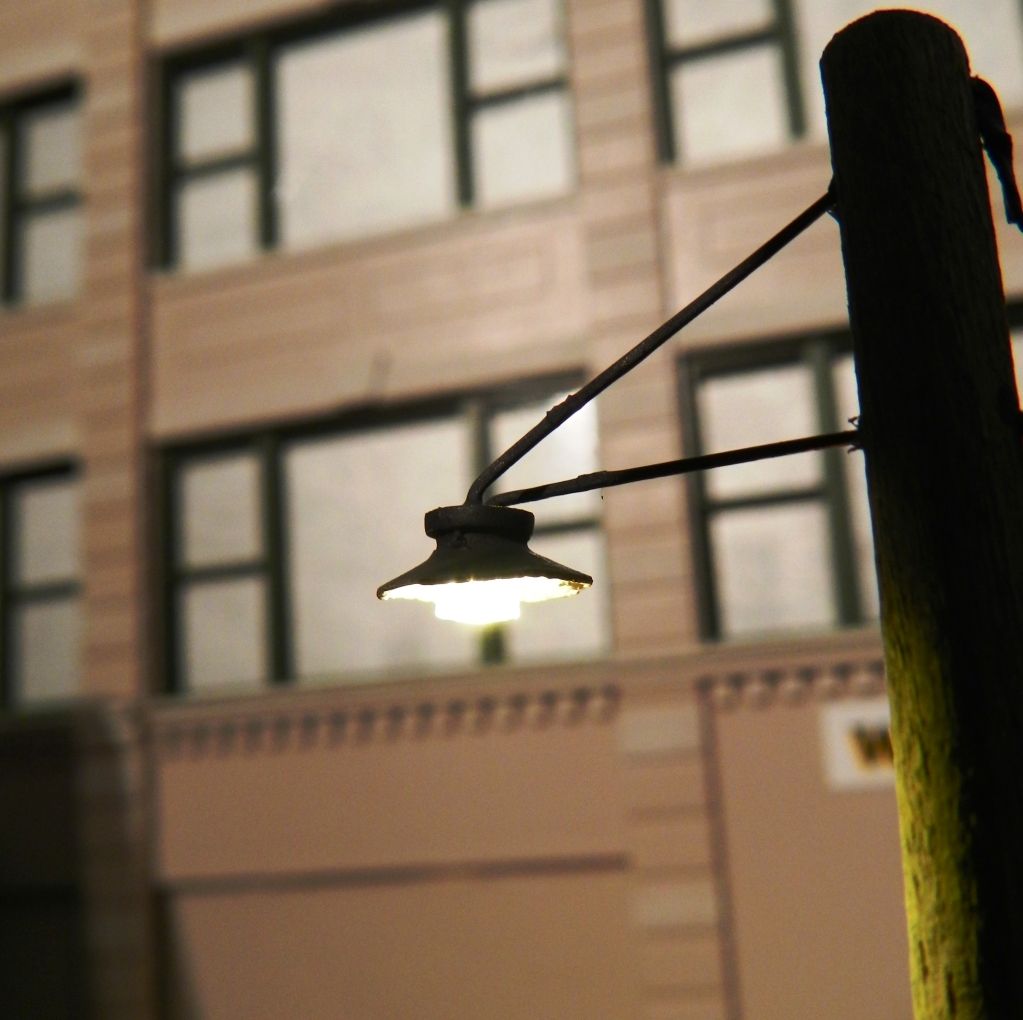
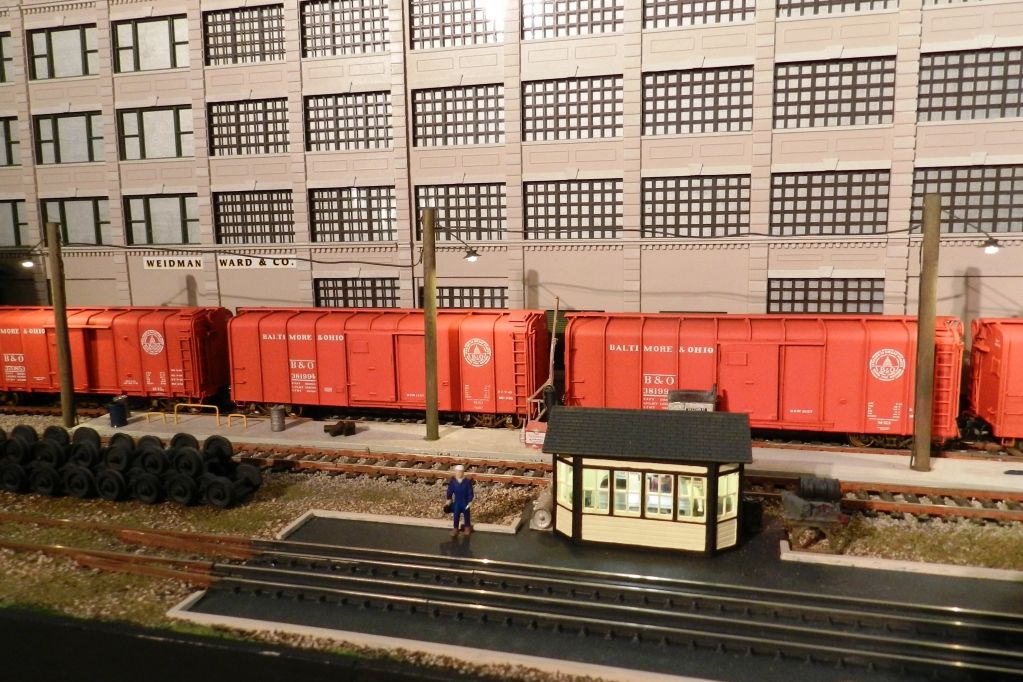
The be even more economical, some of my lampshades are made from plastic wheels (free), taking the cost down to 17 cents per post.


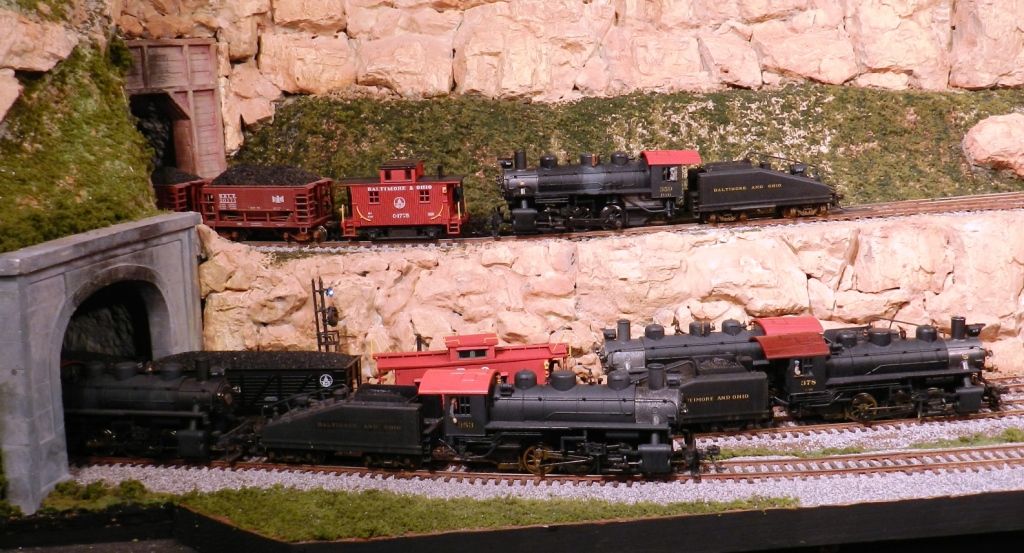
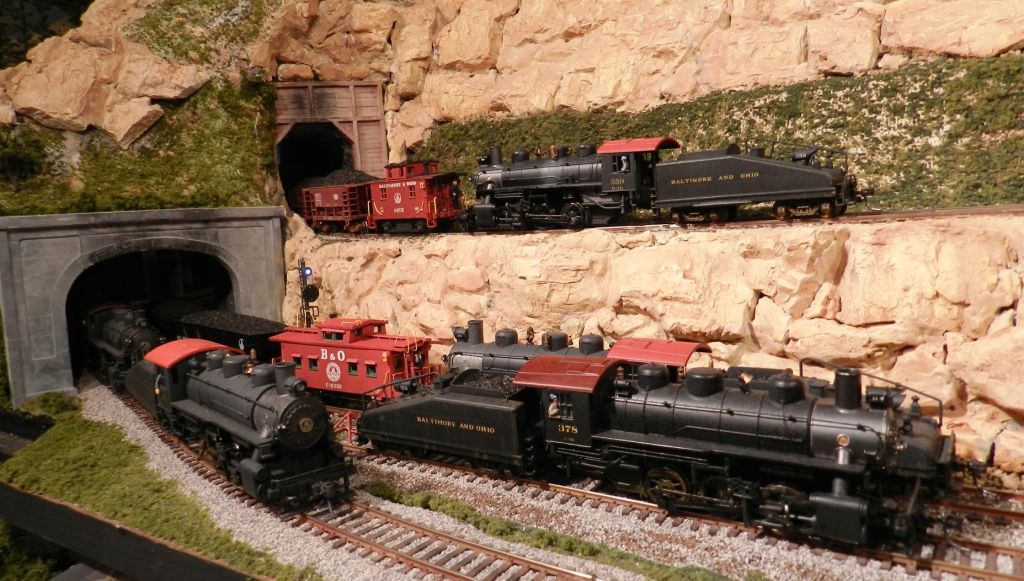
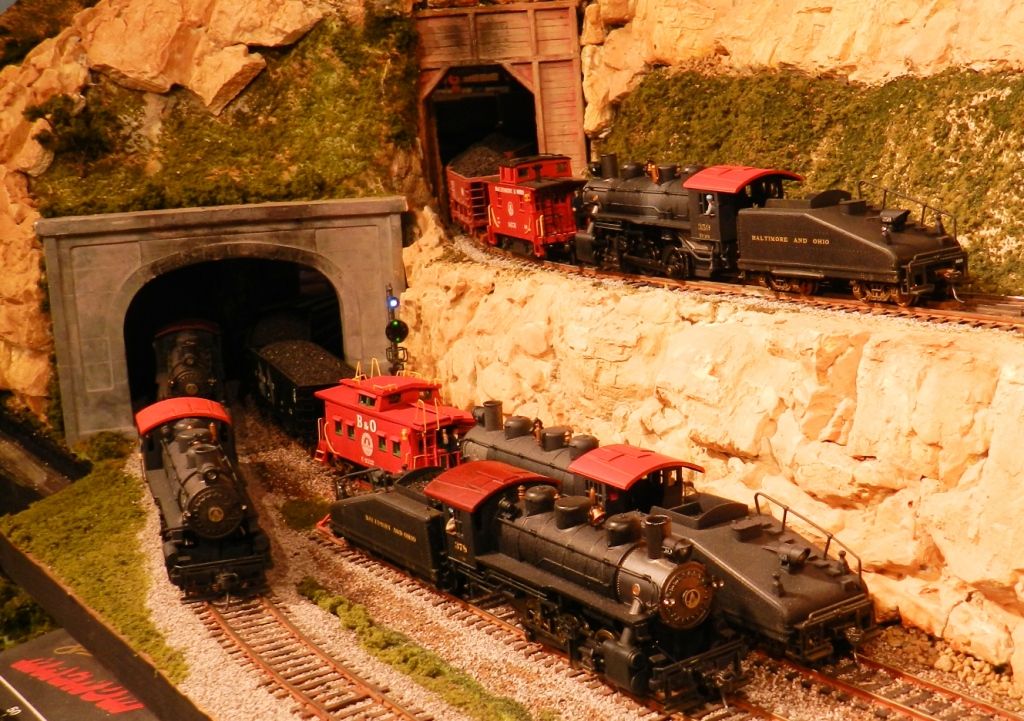
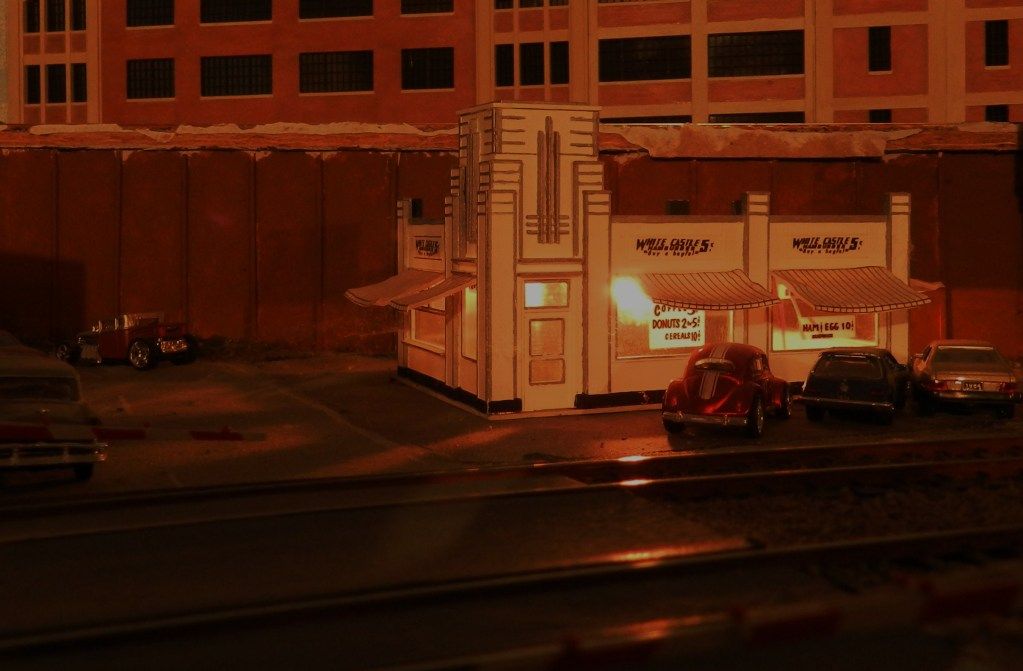
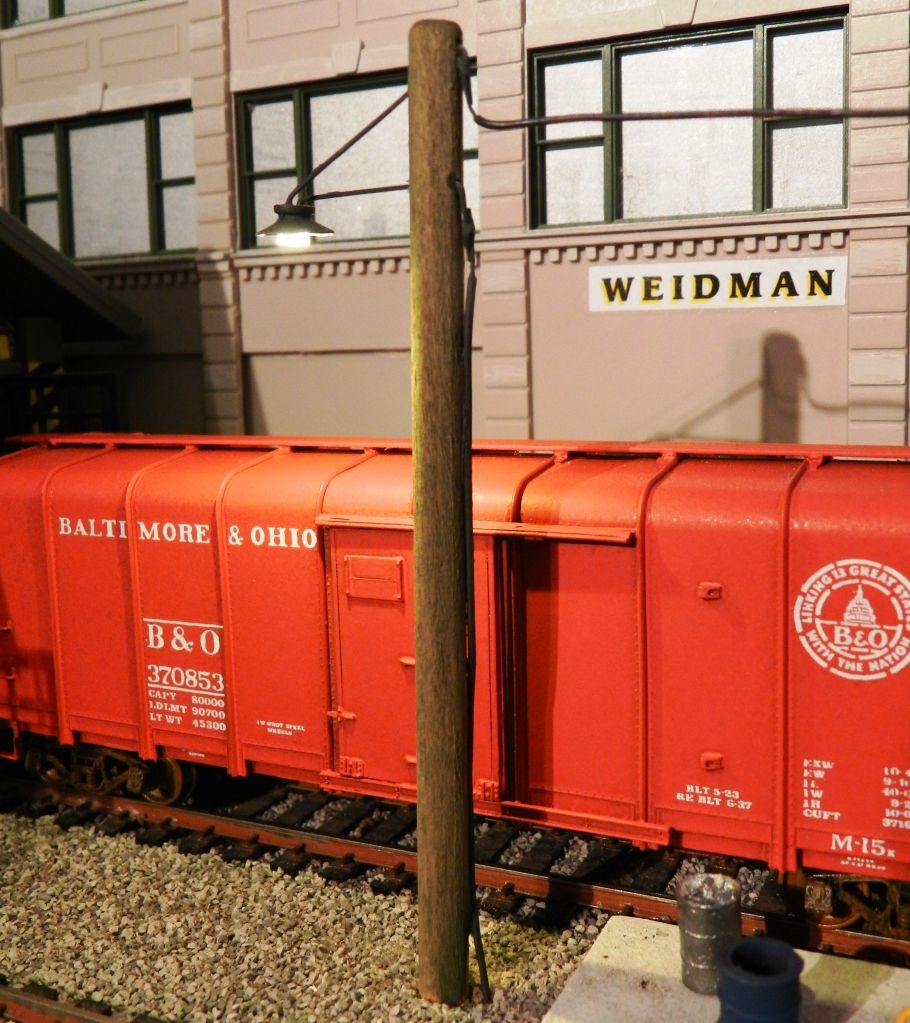
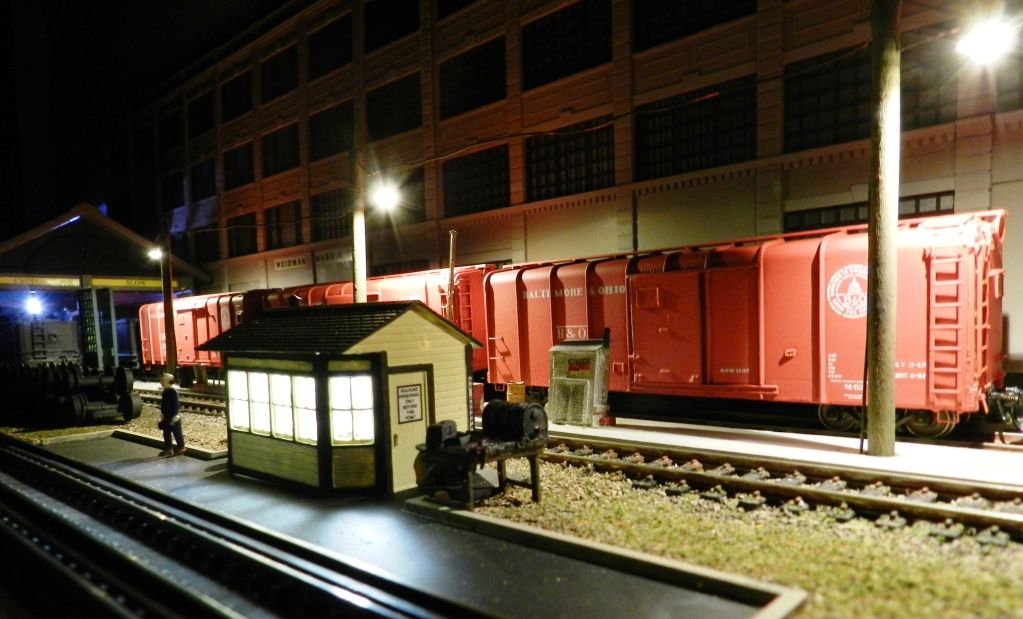
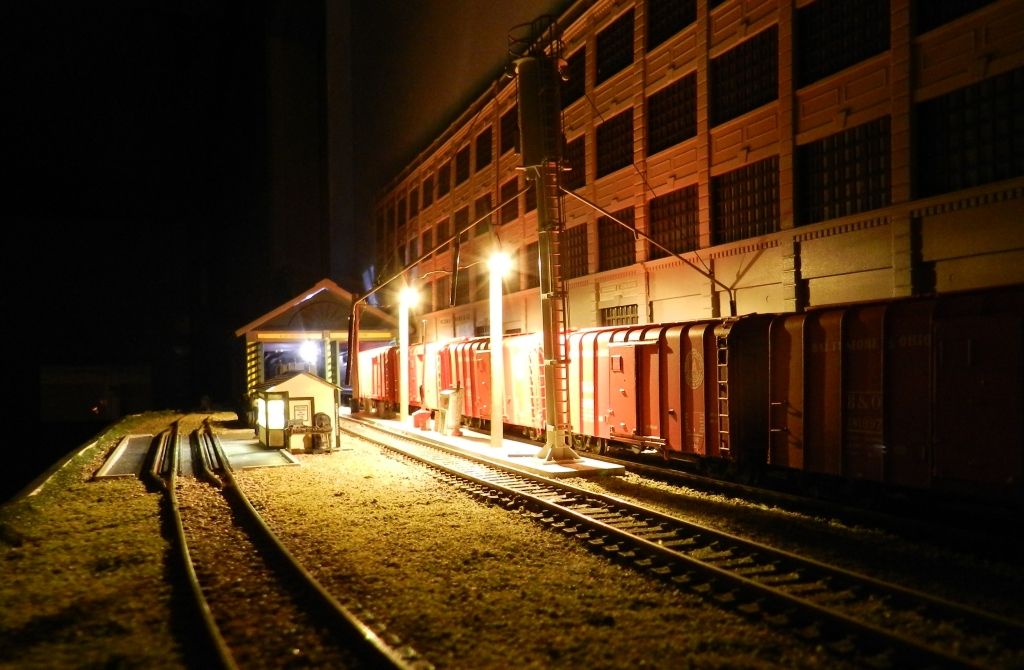
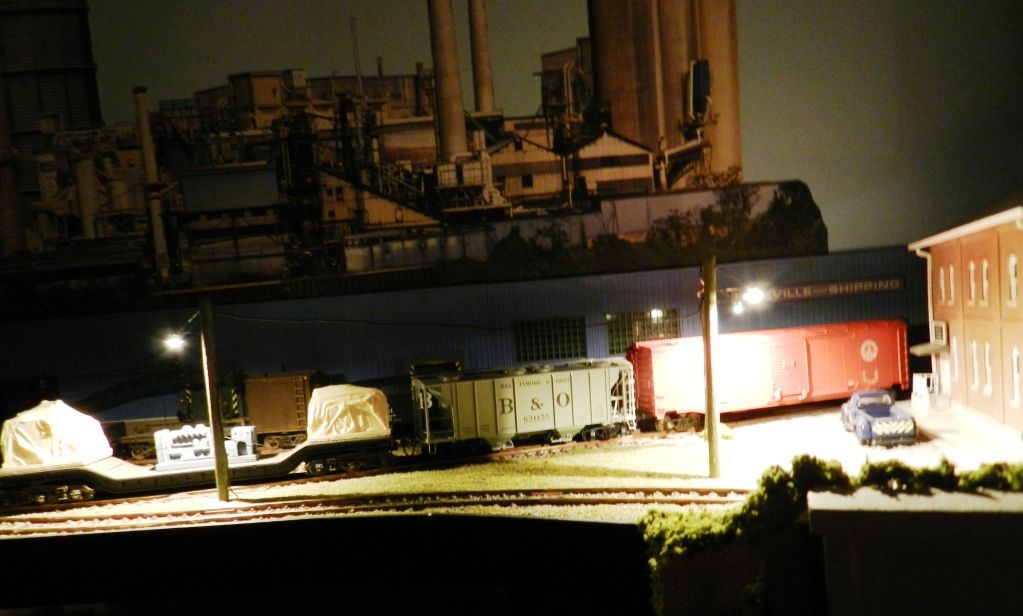
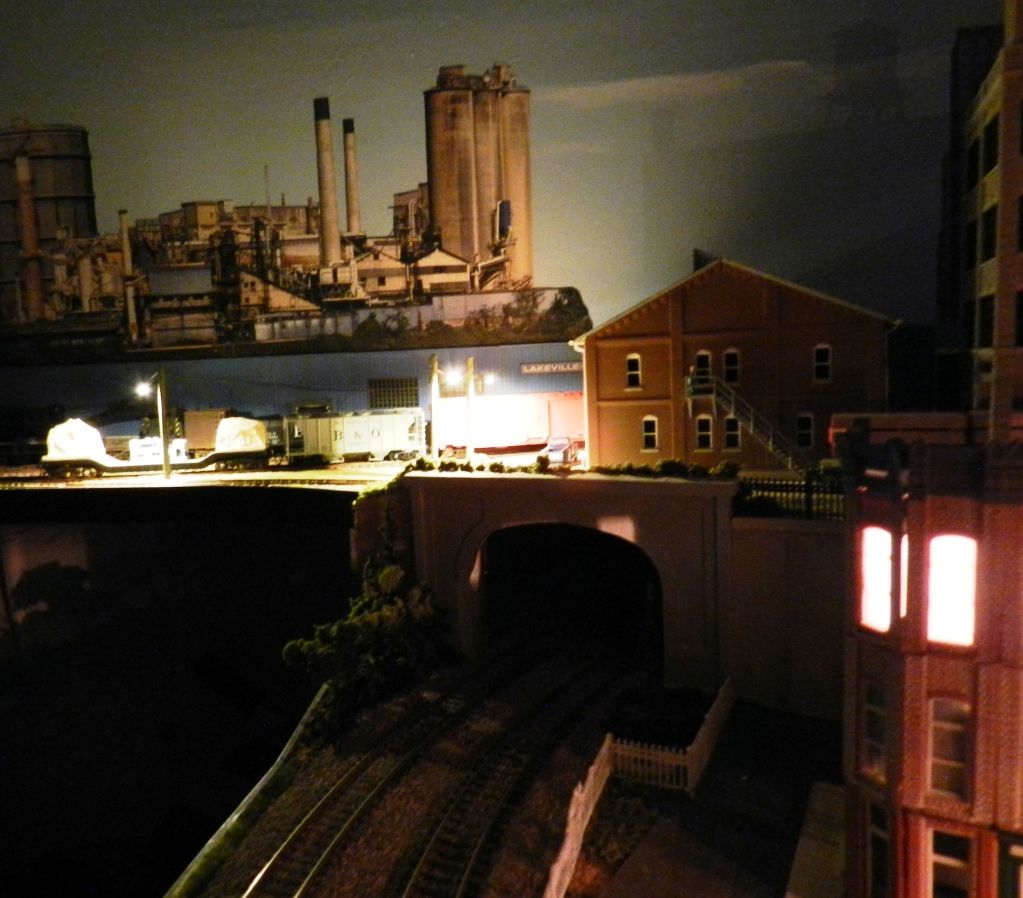
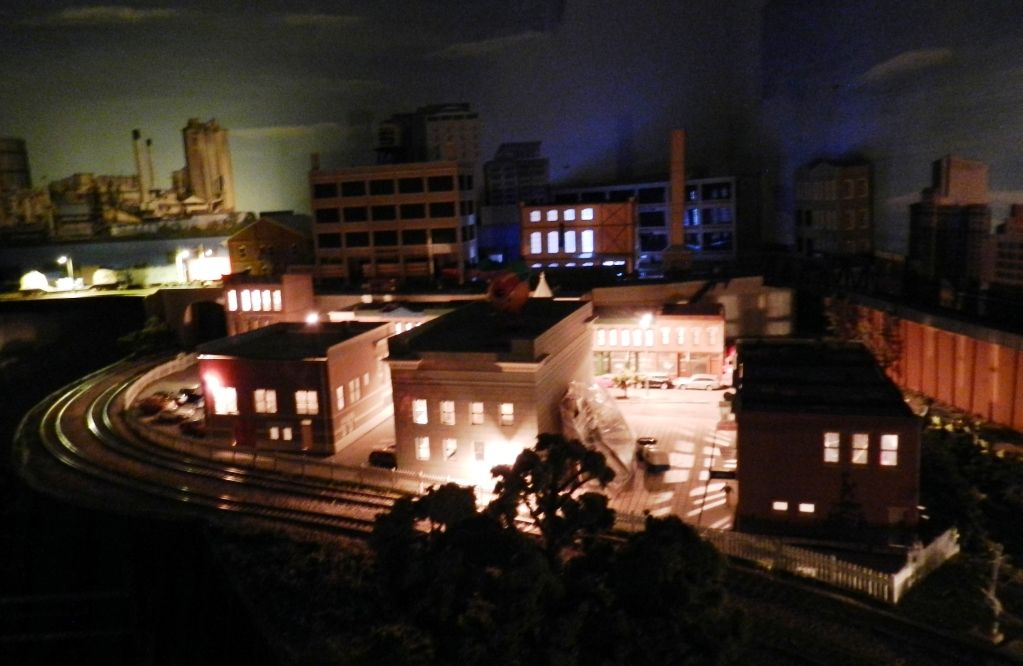
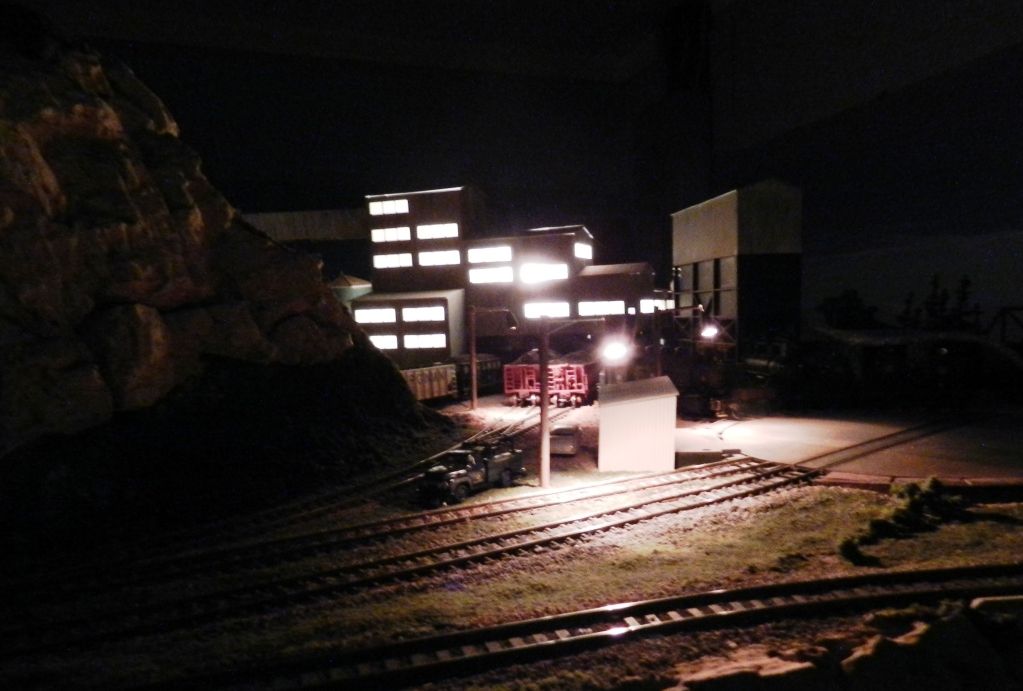
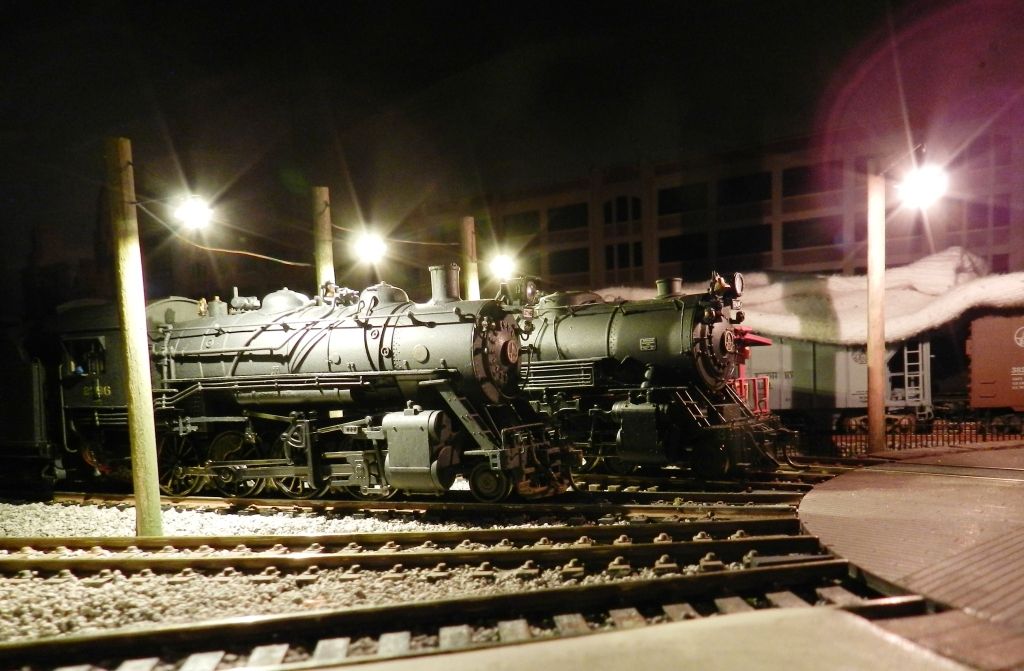
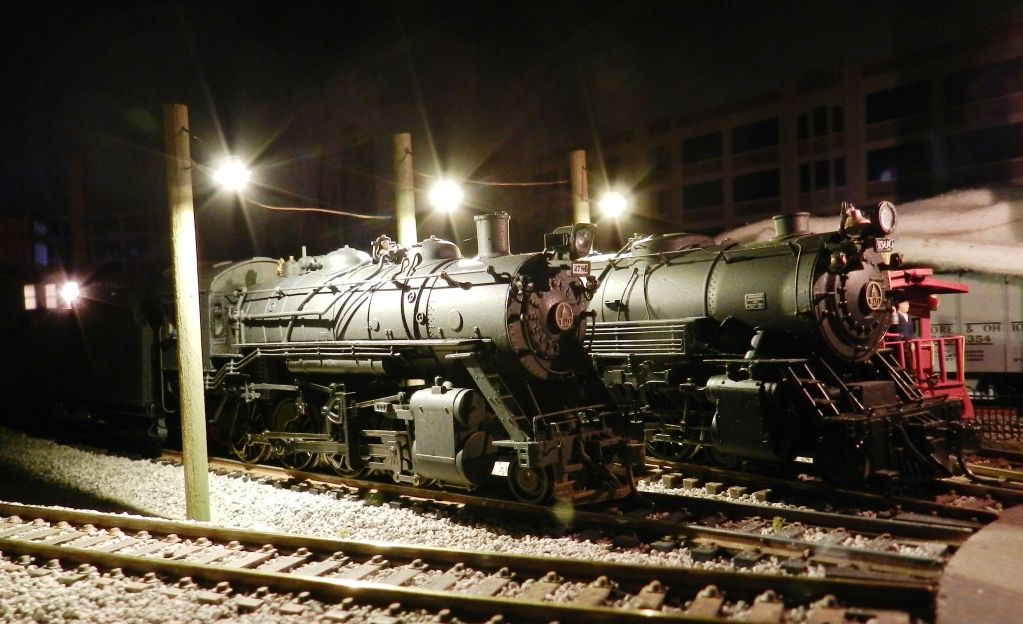
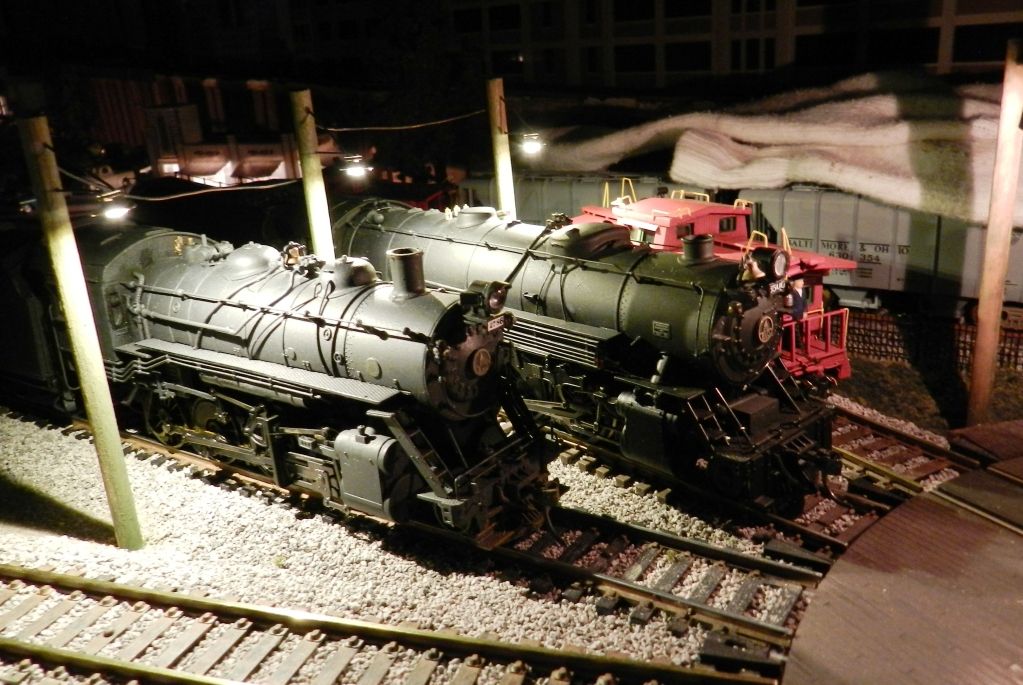
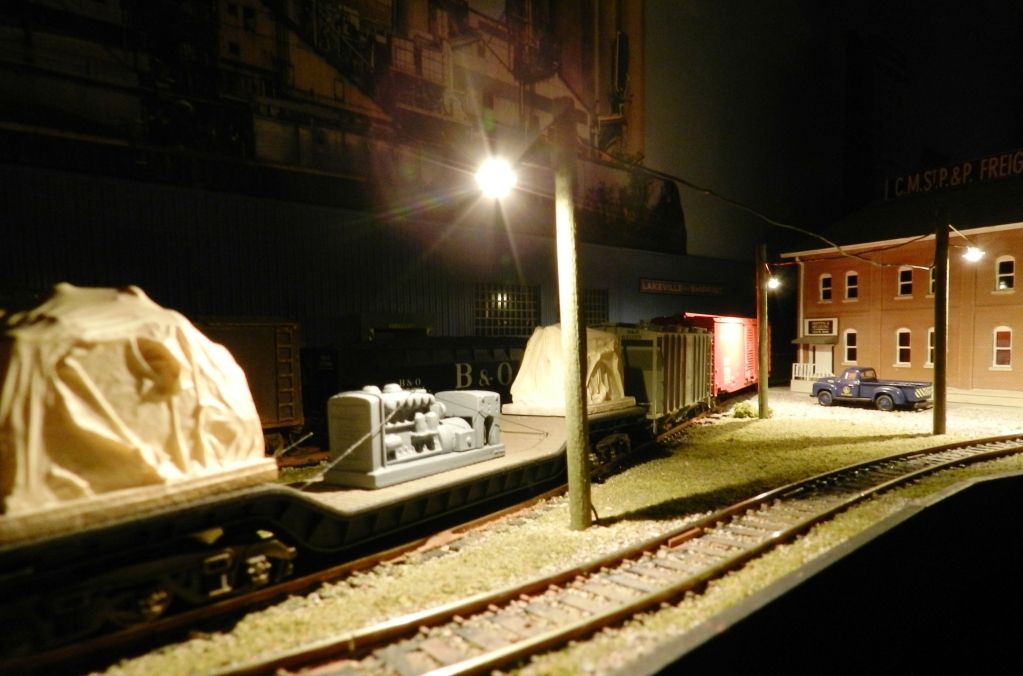
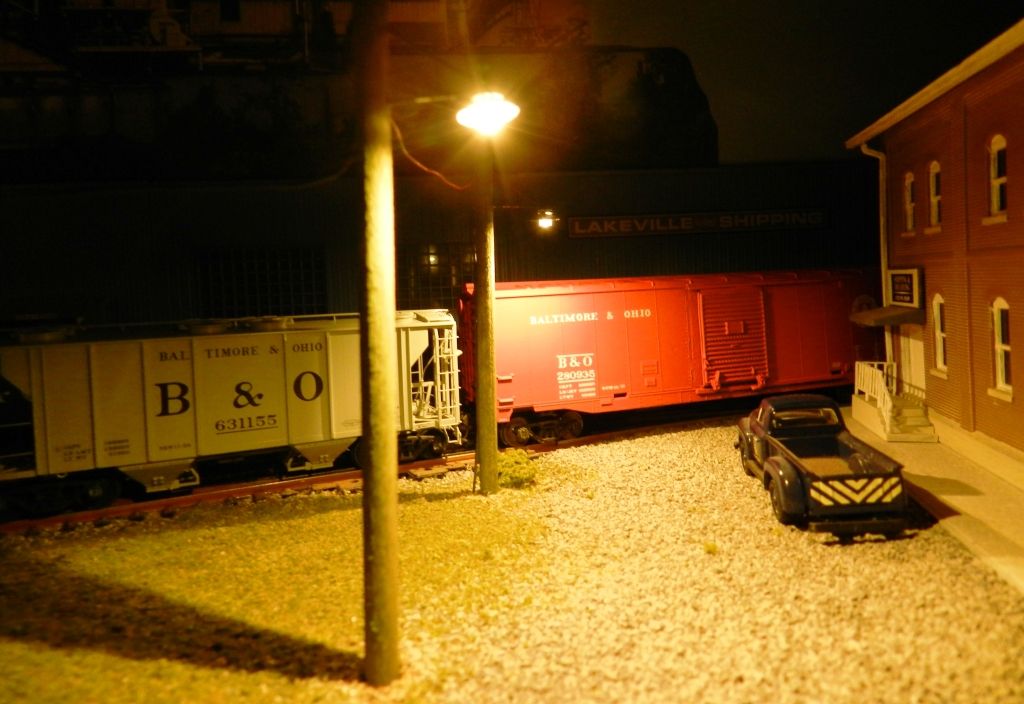
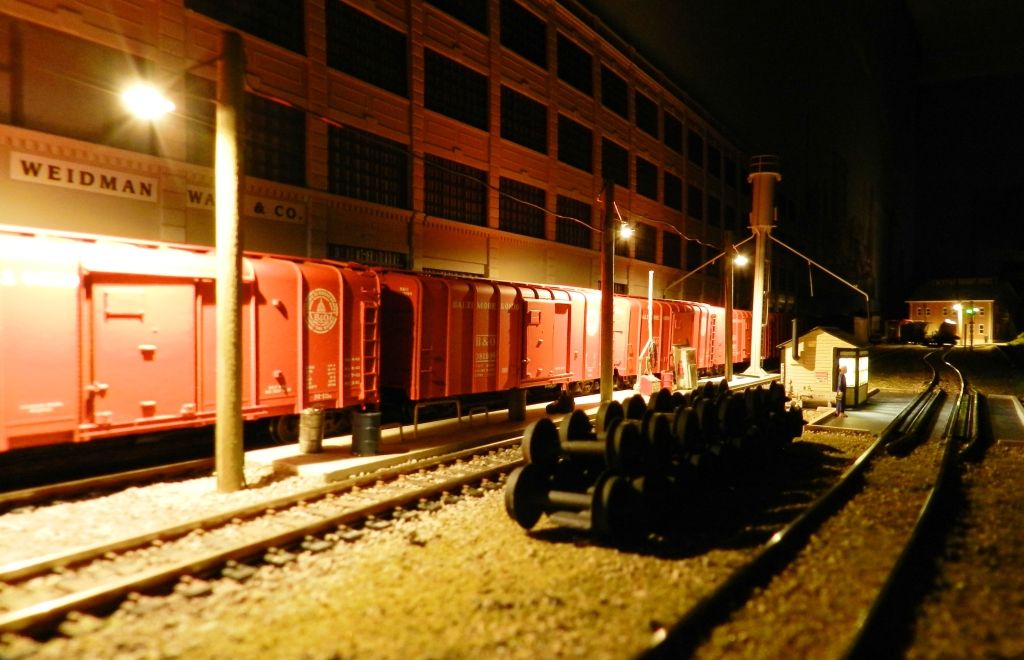
What follows are some night-time shots of my layout using this cheap lighting method.  Oh, the 9v wall wart, used for the power source, was from the junk box.  So no cost there, either.


Regards,

Jonathan


#62
Folks,

I made a discovery recently that may be beneficial to those who like to play with lighting and modifications to their locomotives.  

I had always assumed (uh oh) that the resistors for leds on these locomotives were located on the PCB boards.  Imagine my surprise to discover the led for the headlight on this locomotive was actually located in the split frame, behind the led, not on the board.  It was racking my brain why I couldn't get one of my headlights to work.  It was because I accidently cut out the resistor.  This locomotive is an older, 'black box' Spectrum 2-8-0 with DCC on board.  The next two pix show that resistor that I am rewiring because I raised the headlight, as I am want to do:


It will be tough to squeeze the wires between the frame and the back of the smokebox.


For the reverse light, I soldered wires to the dummy plugs and added a diode so the light will come on in reverse only:


If I wired it backwards, no  problem.  I just swtch the dummy plugs:


I used a 12v GOW bulb in the back of a brass reverse light;  Two #76 holes are drilled in the tender to run the wires.


This works for my home layout because it is DC.  I have DCC locos for my club layout and module display layout.

Additional tender mods were to move the ladder to the correct side, scratched up some footboards, and added a cut lever.  The stanchions were salvaged from an old Bachmann 2-6-2 tender.  Cool.


Finally, is all the weird stuff I do to the loco shell to get it more B&O like.  I've posted about this before.  No need to rehash the subject.


Waiting on some detail parts to complete this locomotive.  So she's a work in progress.

Hope this helps someone who likes to tinker.  :)

Regards,

Jonathan
#63
HO / Tool Car Project
August 14, 2012, 08:30:17 AM
For once, I'm not modifying a Bachmann Locomotive.  It was time I start working on some interesting rolling stock for my railroad.  This is a Scale Tool Car; a model that does not exist in plastic or brass (no B&O car anyway).

I took a 40ft wooden box car (maker does not matter) and chopped it up so only the roof and underframe went untouched.  I made the ends, vestibule and inner walls from Evergreen HO wood siding.  This is as close to scrathbuilt as I can get so far.  Call it a scratch-bash I guess.

What follows are progress photos of the build. I hope to finish the car by the end of the week.

The rough/distressed nature of the sides are intentional because:

1. These cars were made from M-15J box cars built between 1916-1923 IIRC.  

2. They were modified several times and used heavily over a period of decades.

3.  As non-revenue cars, they didn't receive the same attention as money-making cars.

Hence, I will be weathering the car heavily.  Will post the final pix when done.

Regards,

Jonathan


#64
HO / New Run of the EM-1 with New Numbers?
July 20, 2012, 07:41:47 AM
Folks,

Just read, on another website, that Bachmann will be issuing a new run of EM-1s with new numbers:

#7603
#7620
#7629

Since we haven't seen a Bachmann announcement as yet, I can't say how reliable this is.

There may be some out there who intend to create a stable of all 30 EM-1s.  I've read posts from some boasters on other forums that this is indeed their intention. This would save on having to decal them yourself.

Just sayin'...  :)

Regards,

Jonathan
#65
HO / Moving Domes on a 2-8-0
June 11, 2012, 07:10:37 PM
I've searched and searched the forum, poked and prodded... Finally I couldn't take it anymore and took a pair of pliers to a Consolidation to remove the domes.

Will have to fill in the large hole as that dome will be moved forward--actually replaced with a brass dome.  The other hole will be covered with another brass dome.

Willing to take any tips on how to fill in the forward hole.   ;D

Ouch!


Other parts have been removed as well.  They were easier to yank out.

Regards,

Jonathan
#66
HO / 0-6-0 Traffic Jam
May 31, 2012, 12:50:56 PM
Just completed my 5th 0-6-0 modification.  It's getting crowded on the layout.  Enjoy.


Regards,

Jonathan
#67
It may seem a bit premature to start thinking about the upcoming NMRA Convention in July.  However, it's been on my mind.  Last year, the folks at Bachmann really wowed us with some great new offerings.  I am enjoying my EM-1s.  Seems like the new sound-valued locos are a hit.  From reading some of the posts in other scales, seems everyone got a little something they were hoping for.

What can everyone be hoping for this year?

1. I would love to see a RTR caboose to go with the EM1; an I-1, I-5, I-12 or I-17 would be great.  No one has ever done a prototypical RTR B&O caboose (except bra$$).  I know that may be too much of a niche market.  I can dream, however. Wagon-top covered hoppers would be a bonus, too.

2. I like the sound-value concept.  The ever-popular 2-8-0 would be a great candidate for a sound-value version.  OR... bring back the Heavy/Light USRA Mountain with sound value.  Actually any of the diesel offerings would be great with some affordable sound.

3. While a Spectrum, USRA Mikado/Pacific would be nice (good modification possibilities), I know others have done it, so probably not gonna happen.

4.  For the N scalers, I hope they get their EM-1.  The 2-6-6-2 made the transition after all.  Why not the yellowstone? Hoping you get your wish, Skipgear.

Like I said, this may be a bit early, but perhaps we can vent our dreams a little bit.  I put this post in Genereal Discussion, so members from all scales could weigh in... if so desired.  Just had to get these thoughts out of my head so I can focus on other things, like building rocks and installing signal systems.  :)

Regards,

Jonathan


#68
HO / Wall Wart/Electrical Question
March 28, 2012, 08:33:20 PM
Long story, short:

I have three wall warts to choose from, for running some tortoise switch machines, and possibly a little lighting.  All are 9V, which I know is enough to operate the machines, albeit a little more slowly than 12V.

One operates at 200mA, another 500mA, and the last has a full 1 amp.  I want to use the 9V/1amp device, thinking this would provide the most 'oomph' (tech speak for we electrically challenged).  Is 1 amp too much flow?

Thanks.

Regards,

Jonathan
#69
HO / Modular layout video
March 14, 2012, 04:41:08 AM
Just for fun, here's a couple of videos of my trains, running on our modular layout

http://youtu.be/WVhIBEmunUo

http://youtu.be/FmIoR6PNLPs

Regards,

Jonathan
#70
Some time ago, a small group of us had a discussion about the possible connection between the Boy Scouts and Bachmann Trains.  Let me share this as a possibility:

Many of the MR clubs in our area, set up displays for an annual Boy Scout sponsored train show.  We fill most of the large spaces of a middle school with modular displays from Z scale to G Scale... even LEGO trains and Live Steam.

This is normally a fund raiser for Scouting in general.  This year was a fund raiser for the Tsunami victims in Japan, specifically Boy Scout Troop #2, none of whom now have a home to go back to.  Who knew there was Scouting in Japan?

Anyway, trains stuff is raffled off, 99% of which is brand new Bachmann items: EZ command systems, the new civil war train sets, various rolling stock; the list goes on.  I didn't ask, but I wonder if these goodies were directly donated from Bachmann.  Certainly there aren't many hobby shops from which to get this stuff.

So we are in the middle of a train show weekend, and I remembered our previous discussion.

Here's a few shots of some HO modules.  No offense to the other scales (their modular layouts were impressive), just didn't have time to shoot pics in the other rooms:


#71
HO / A New Scenery Project: Rocks
February 27, 2012, 05:10:08 AM
I'm forcing myself away from locomotives and rolling stock for while, you know, for Lent.  

I've never been happy with my homemade rocks and cliffsides.  So, I broke down and got a giant bucket of Hydrocal and a rubber rock mold, at the last train show.  So I'm learning how to play nice with rock molds.

I've studied how others have done the project.  I'm trying to break up the pieces and secure them to the side with leftover caulk, from all the house projects.  The rubber cement just wasn't working too well.  And I need to stay away from my wife's hot glue gun:


I'm using the boxcars to make sure I don't get too close to the tracks.  Can always file down a rock or two if I have to.

Project is coming along slowly.  My plan is to fill in the cracks with Spackle (got lots of that, too).  Then use some acrylic paints for color.  The paints will be made into washes, using brown, grey, tan, and whatever else seems appropriate.  

Just wondering what others have used to color their rocks.  I've never been happy with my rock colors.  They all end up a medium grey.  Seems like model railroad rock, Northeast/Midatlantic US, should end up with more of a brownish or tan tint to them.  I dunno.

Regards,

Jonathan
#72
HO / Experimenting with a new camera
February 25, 2012, 02:22:48 PM
Here's the first two test shots with my new camera.  I can control the f-stop (aperture) to f/8.  That means nothing to me, yet, other than I get more depth of field.

Test:


We'll see if I get any better at photography with a new tool.

Regards,

Jonathan
#73
HO / Completed Fleet of 0-6-0s
February 22, 2012, 04:55:55 AM
Just finished my fourth 0-6-0.  Some folks can't stop collecting the Connies... my obsession is the 0-6-0.

This was a UP #4439 (DCC) I purchased from The Favorite Spot.  Let's say my winning bid was about the price of a basic decoder.  Every once in a while, I'll bid ridiculously low on an item, and I'll actually win.  Go figure...


No engineer, yet.  Will find one at the next train show.


Ran out of tender pick up trucks.  Used some scrap brass to fashion a reasonable facsimile:


Making the valve gear hangar look a little more prototypical, is no easy task.  The clearance between crosshead and front of the eccentric rod is rather tight.


This is the T-Nut I use to share current between tender and locomotive:


I put extra weight everywhere:  the domes, the stack and even the cab roof.


This was fun, AND it runs well.

Regards,

Jonathan
#74
Just felt like I needed to put in a plug for the great running locos that I used on the club modular display this past weekend.

The EM-1 (sound) was a great hit, ran smooth as silk, and I received some nice compliments throughout the day.  Some of the old hats were chatting amongst themselves, wondering if this was a brass model or plastic.

The DCC onboard 0-6-0s, likewise, ran very well.  I double-headed those and pulled a 17-car train for over an hour without a hitch.

Of course the Berk and Consolidations ran perfectly as well.  Although, I did let a youngster/observer take the throttle.  He proceeded to go crazy with the buttons, and somehow threw off the chuffs on my 2-8-4/Tsunami.  Hope I can get a Sound guru to get the chuffs back in sinc.

Hats off to the Bachmann folks.  You are responsible for me having a great deal of fun running trains out in public.  Thanks for making a grown man feel giddy as a kid on Christmas.

Regards,

Jonathan
#75
HO / Tender - ize Me!
December 24, 2011, 06:24:12 AM
For many months now, I have been tinkering with a Spectrum Long Tender.  These were leftover from my Spectrum Mountain project.  Just picked one up every once in a while, worked on it, and put it down.

Now I'm just about done messing with the former long tender.  To generalize, I shortened it 50mm, modified the tender pick up, added a reverse light and made a new draw bar.  The paint is still drying, but I intend to connect the tender to my 2002 0-6-0.  I never liked the larger tender, and I couldn't find a separate slope back tender to modify.  So...  here is it.


The reverse light is made from two pieces of brass tubing.

There is a prototype for this tender.  However, I made it a couple scale feet shorter than the original.  Oh, and the ladder is on the wrong side.  I was too lazy to move it over.

Regards,

Jonathan
#76
HO / Exploring the Spectrum EM-1, 2-8-8-4
December 11, 2011, 07:11:48 PM
Having just brought my first EM-1 home,  plan to do a bit of exploring and inspecting before running my loco.

This is the B&O #7600, 2-8-8-4.  I will be installing sound whenever the sound units show up.

I put this beasty next to my next largest locomotive; the Spectrum 4-8-2 Mountain with Vandy Tender:


You can see the tenders are the same length.  Of course, the articulated is much longer than the Mountain.  I measure the EM-1 at 17.5" from coupler face to coupler face (draw bar in the long hole):


There are some extra parts included in the box.  The dual headlight option (never installed on #7600 I think), optional ventilation plate, coal, and the overfire jets mounted on the side of the firebox.  There are a couple of other parts that I haven't identified yet, but we'll get there.


The instructions/diagrams are much more detailed than previous locomotives:


However, there are still no instructions on how to remove the loco shell.  Guess I'm going to have to study the diagrams and make some educated guesses.  This is one thing Bachmann should really add to their paperwork, HOW TO TAKE OFF THE SHELL.  Oh well, I'll figure it out.

That's all for now,  Just wanted to make a quicky start.  I intend to take lots of close ups, both inside and out.  And describe what I find as best as possible.  Hope this will be helpful.  

BTW The loco feels nice and heavy.  The tender rolls unbelievably free.  So far so good.

Regards,

Jonathan

#77
HO / Using Youtube
December 01, 2011, 12:03:09 PM
Call me behind-the-times it you wish.  I recently set up a youtube account to see what it was all about.  I found setting up an account was much easier than photobucket.com.

Additionally, my herky-jerky videos move much more smoothly using this tool.  As an experiment, I uploaded an old video I made when I completed work on my Varney Docksder.  It took seconds instead of minutes.  Still my camera is a cheapy so the video is still a bit pixelated.

http://www.youtube.com/watch?v=h5MoCorYztk

However, this will be a much better tool when demonstrating future tinkering projects.  Now all I need is a better camera. I recommend it.  Then I'm easily impressed, too. :)

Regards,

Jonathan
#78
General Discussion / Another Hobby Store Goes Under
November 20, 2011, 09:06:14 PM
It was sad really, as I rumaged through the last items on the shelves of a Hobbytown.  Today was the final day.  This store, while not the greatest, was only 1 mile from my house.  It was very convenient when looking for a little paint, strip wood, styrene or #11 blades for my hobby knife.  The next closest store is quite a distance.

I took advantage of the last day as they were offering 90% off everything.  I swept up all the little brass screws, washers and nuts.  There was an NWSL quartering tool I had always wanted.  The price was certainly right.  Picked up everything that might even come close to being useful.

We are getting closer, I think, to a day when everything is ordered on line.  Hopefully, the train shows will keep coming around.  I like to pick up, study, smell, taste and shake an item before I decide to buy.  This is hard to get use to.

Regards,

Jonathan
#79
HO / Upgrading Old Rolling Stock
November 18, 2011, 05:16:42 AM
This is an attempt at an answer to the countless threads on this forum, concerning what to do with old rolling stock that won't run with new rolling stock.

I believe I share a mutual sentimental attachment to my old equipment.  It's next to worthless to the MR world, but means something to me.  So... how do we get these dinosaurs running again?  As an example of what can be done, I will use an old box car.  This is an AHM model that was part of a set I received for Christmas some 41 years ago (jeepers, I'm old).


Three things need to be fixed to get it "rail worthy":  weight, trucks and couplers.

Weight
I opened up the car and used a little epoxy to fasten an extra metal plate to the existing plate.  It's still a little underweight, but my track work is so great, that underweight is no problem. ;D


Trucks
This old car had trucks attached with plastic plugs.  I'm sure we've all seen this before. I removed the truck, pushed the plug back into the bolster as far as I could, cut off the remaining plug sticking out, and applied some plastic cement (let it soak in and dry for a couple of days).

Drill a 1/16" hole in the bolster.  Use a 2-56 tap to make some threads for a 2-56 screw (.25").  Voila!  Use whatever free rolling set of trucks you desire.  You can tinker with other types of leftover small screws (I have), but the 2-56 seems to work best.


Couplers
This car had truck mounted couplers (talgo trucks).  I sanded down the ends of the car and attached Kadee coupler boxes.  In this case, I used some EZMate Mark II couplers that were lying around.  They work pretty well.  If they fail, metal couplers will soon follow.  That's it folks.  There may be some height adjustment required using fiber washers on the truck bolsters.  In this case, the height was correct.


Because I have been modeling a while, I had all these parts available at my work bench.  For a first-timer, there will be some cost for gathering the necessary parts.

This car is still essentially worthless.  However, it can now run with my 21st Century equipment.  The sentimental value is what matters here--watching my childhood memories running with the new equipment is priceless.  Somehow, I think I'm not alone.

Regards,

Jonathan


#80
HO / Double-heading DC and DCC Locomotives?
November 15, 2011, 05:23:38 AM
Folks,

This morning I did this:


The front loco is a 1992 version of a Prairie modified to an 0-6-0.  It is DC.  The second loco is the new DCC 0-6-0.

When testing, the old 0-6-0 started moving before the DCC 0-6-0 (of course). However, at around 5 volts, both locos would run at the same speed.

When double-headed, the DC loco (in front) would spin its wheels a bit, before enough power was applied so both locos would run at the same speed.  I ran this train for about 10 minutes without issue.

Am I running the risk of damage to the DCC loco by running like this?  It wouldn't be a regular thing (they are switchers after all).  Still, kind of fun, if I can do it without hurting anything.  Thanks for your time.

Regards,

Jonathan